
The Simple Step-by-Step Process of Replacing a Tooth with a Dental Implant
Losing a tooth isn’t fun. The good news is that dental implants are now readily accessible and are the best way to replace a missing tooth. They closely mimic the look, feel, and function of a natural tooth, and have become an increasingly popular option for patients.
But if you’ve ever tried to Google how a dental implant is placed after a tooth extraction, chances are you ended up reading explanations that somehow still didn’t make things very clear. Or maybe you asked your dentist and walked away with more questions than answers.
So, what does it all actually mean? Let’s break it down in plain English.
Before we walk through the steps, it’s helpful to know that dental implants are a very predictable and well-established treatment that dentists perform every day.
Here are the simple steps of how a dental implant is placed — from start to finish.
- Tooth Extraction
- Bone Grafting
- Implant Placement
- Implant Uncovering
- Abutment and Implant Crown
Step 1: Tooth Extraction – Out with the old.
If the damaged tooth is still in place, the first step is removing it. This is called an extraction, which simply means the tooth is carefully removed from the jaw.
The goal is to remove the tooth while keeping as much healthy bone around it as possible. Think of it like removing a fence post without damaging the ground around it.
Goodbye problematic tooth! You won’t be missed.
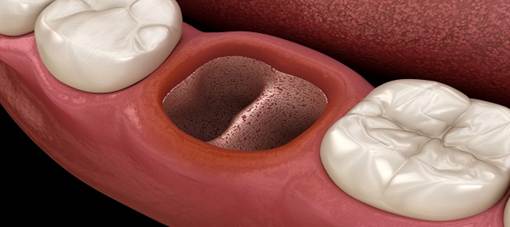
An extraction socket in the jawbone after tooth removal. Healthy bone lines the entire socket.
Step 2: Bone Grafting – Laying the foundation.
After a tooth is removed, we prepare the area so it can heal properly and eventually support a dental implant. The bone that previously held the tooth in place can shrink over time. Unfortunately, bones behave a bit like muscles — if you don’t use it, you lose it.
To prevent that, we often place a bone graft in the area where the tooth was removed. This is typically done the same day the tooth is extracted.
Bone graft material has a texture that’s very similar to wet sand. The tiny particles are made of real bone, but don’t worry — it’s not taken from your body. The material is carefully prepared ahead of time and ready to be placed during your appointment. A helpful way to think about bone grafting is to imagine gently filling a small cup with wet sand using a spoon. The cup represents the space left after the tooth is removed, and the wet sand represents the bone graft material. Another analogy is pouring a solid foundation before building a house.
A bone graft simply helps your body rebuild and preserve the bone in the area where the tooth was removed and prevents the bone from shrinking. Over time, the bone graft hardens and integrates with your surrounding bone. Why do we do this? Because an implant needs strong, healthy bone to hold it in place.
A bone graft must heal for approximately 4 months before a dental implant can be placed into that site. Once the bone has healed and is strong enough, it’s time to place the dental implant.
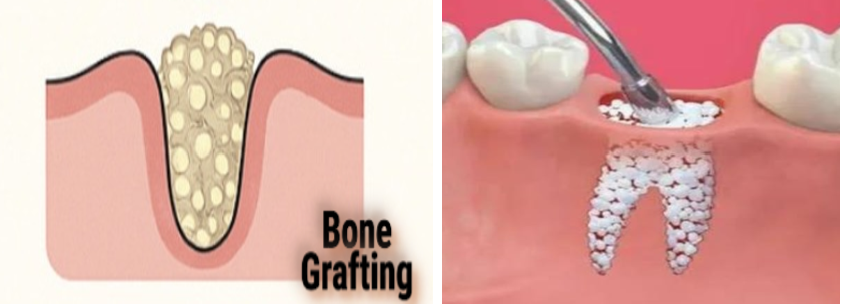
Bone graft particles fill the space of a small, extracted tooth (left) and a large, extracted molar tooth (right).
Step 3: Implant Placement – The new tooth root goes in.
A dental implant is a small titanium post or screw that acts like an artificial tooth root.
During the implant placement procedure:
• A small space is prepared in the bone
• A titanium implant is gently placed into that space
• The gum is closed over the implant while it heals, so there is nothing visible above the gums just yet.
Like bone graft, a dental implant must heal for 4 months before the crown or new tooth can be placed. During this healing time, something really cool happens: your bone naturally grows around the implant and locks it in place. The implant becomes firmly anchored in the jawbone, just like a natural tooth root.
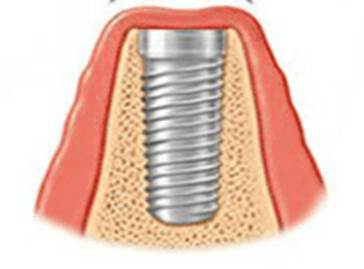
A dental implant in the jawbone. The gums are fully closed over the implant.
Step 4: Implant Uncovering – The implant makes its debut.
After the implant has healed and is locked into the bone, the dentist performs a small, quick procedure to uncover the implant.
Remember, the gum tissue was covering it while everything healed.
During this step:
• The gum is gently opened to expose the top of the implant
• A small healing cap is placed on the implant and sits above the gum
The healing cap helps shape the gum tissue, so it looks natural around the future crown. Typically, your dentist will let you heal for 2 weeks after the implant is uncovered.
Think of this step like pulling back the curtain before the big reveal.
The gum tissue over the implant is removed and a healing cap (white) is screwed into the implant.
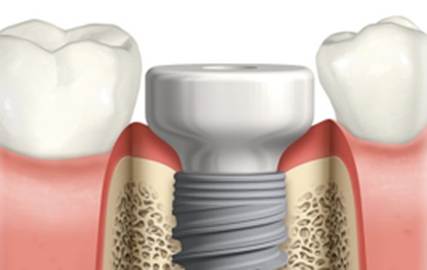
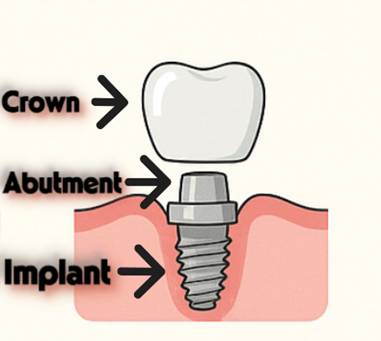
Step 5: Abutment and Implant Crown – The final tooth.
Now comes the exciting part — the new tooth.
The new tooth is made up of two parts:
- Abutment: A small post or connector that attaches to the implant.
- The Crown: The custom-made tooth that sits on top and looks just like a natural tooth.
The abutment and the crown are often combined into a single piece that attaches to the implant. In some cases, however, the abutment and the crown are made as two separate pieces and are attached to the implant individually. Both approaches work well, and your dentist will decide which option is best for your situation.
The crown is custom-made just for you and carefully designed to match the color, shape, and size of your surrounding teeth.
You can chew, smile, and talk normally again. Your missing tooth is officially back in business!
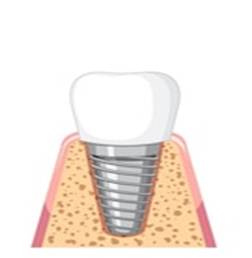
The abutment and the crown seen here as two separate components over an implant.
The Final Result:
From tooth removal to placement of the final implant crown, the entire process typically takes about 8–9 months. This allows the bone and implant adequate time to heal and integrate properly for a strong, long-lasting result. We can’t rush biology!
When the process is complete, your dental implant:
• Looks like a natural tooth
• Feels like a natural tooth
• Feels stable and secure
• Allows you to eat normally
• Helps preserve your jawbone
Most people forget it’s even there!
Which is exactly the point.


